($) USD
0
Gear levels are a serious issue for many players of Lost Ark, just like any Korean MMORPG. However, there are a number of ways players can take the hassle out of lower item-level gear upgrades. In this article, we'll share everything we know about the Lost Ark Gear guide. This includes Gear Traits and Gear Content Segmentation. This is especially to help new players after seeing their struggles at low levels.

You will find 3 item tiers of gear and material.
Pro-tip: The stat cap of combat stats on add-ons doesn't enhance with all the item tiers.
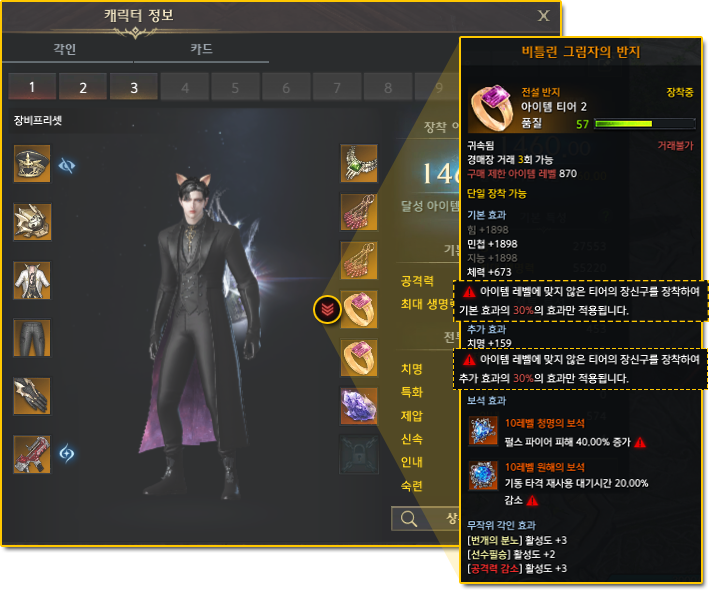
A T1 Relic necklace with Crit/Swiftness, one example, can roll as numerous combat stats as being a T3 Relic necklace with Crit/Swiftness, pending the identical good quality. What changes is the volume of primary stat and vitality that the item offers in its Simple Effects? It is possible to use this for your benefit by developing a mobility set before moving on towards the upcoming item tier applying Relic add-ons of your preceding item tier. For example, my Scouter is in T3 gearing.
Still, for traveling around, I nonetheless use T2 add-ons with substantial Swiftness and sometimes T2 armors, which have supplemental tripods on them for movement capabilities so that they travel additional or quicker.
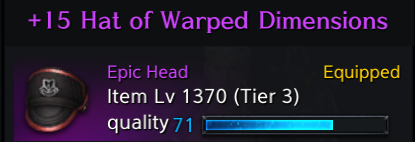
Top-quality is vital for any weapon you use that may get 15% or more significant Additional Harm. This is determined by rarity and where the item is inside the subtler. If the weapon can only cap out at 5%, don't stress substantially about sound quality. Excellent on armors aren't critical. It is just a bonus. For add-ons, good quality is significant within the following buy:
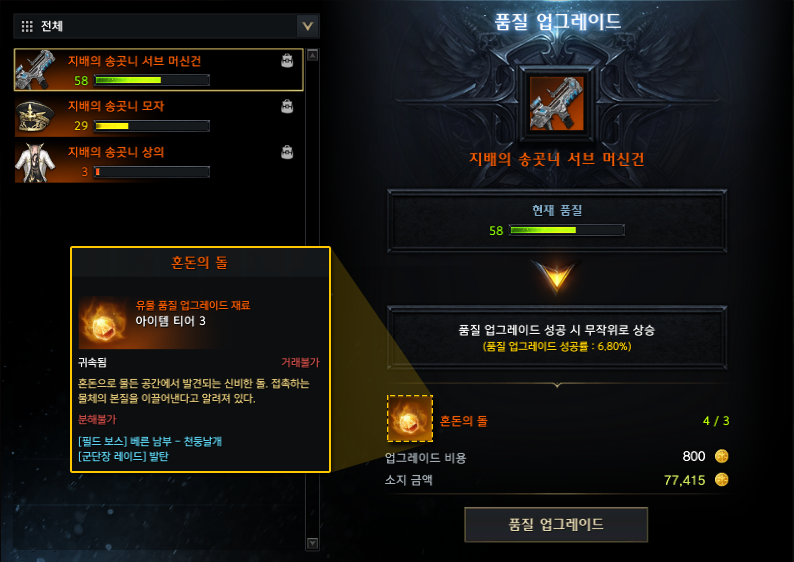
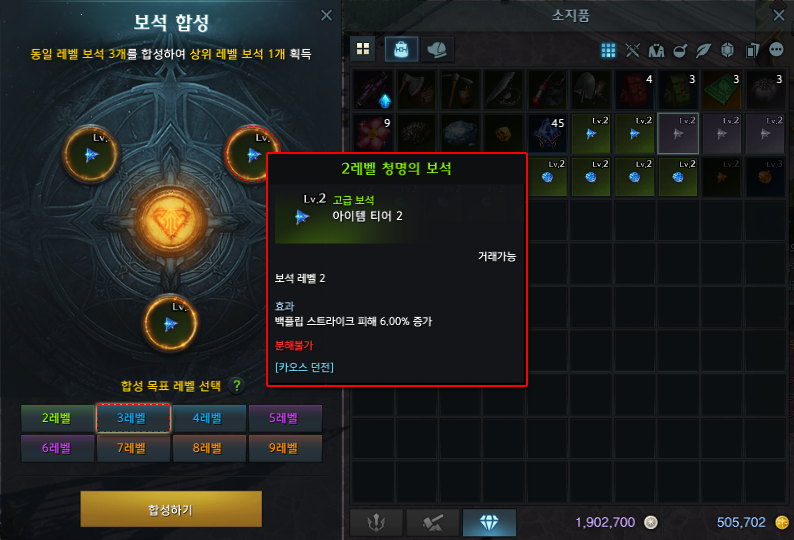
The amount of quality gained on success can make the item jump from 1 quality to 100 or go up by 1. It is entirely random. The odds of succeeding depend on the current quality of the item, and the odds get exponentially worse the higher you go. It is estimated to take 1,000,000+ raw Gold on average to reach a high 90 quality Legion Raid weapon if you don't jump to it immediately and decide to buy non-discounted Chaos Stones.
Current Quality - Success Chance
The chart above shows the chances of crafting a Legion Raid item of that quality. As such, unlike all item crafts before this point, you have a very high opportunity to craft at below 50 quality and frequently under 30 quality.
Be mindful that for DPS, weapon quality at this stage is extremely important, but that this is arguably one of the most extreme gold sinks in the game that is static and unchanging. Most players settle for around 60-80 quality, with more hardcore and heavy spenders pushing towards 90+.
Additionally, when succeeding from one item into another, if the items are the same color grade (e.g., Relic to Relic), then the quality and existing Craftsman's Energy will also transfer to the new item. The exception is if the item you're succeeding in has a higher quality already.
Finally, when succeeding from Mid T3 Legion Raid equipment to Upper T3 Legion Raid equipment.
The system of upgrading quality is not relevant to NA/EU until they reach T3 mid-Legion Raid equipment. Any gear you receive before this point cannot have the quality-adjusted in any way.
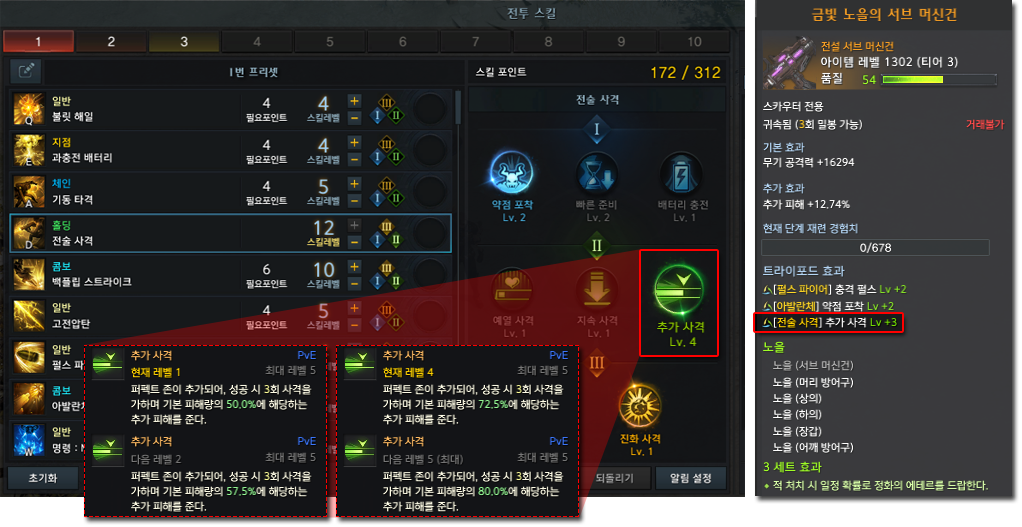
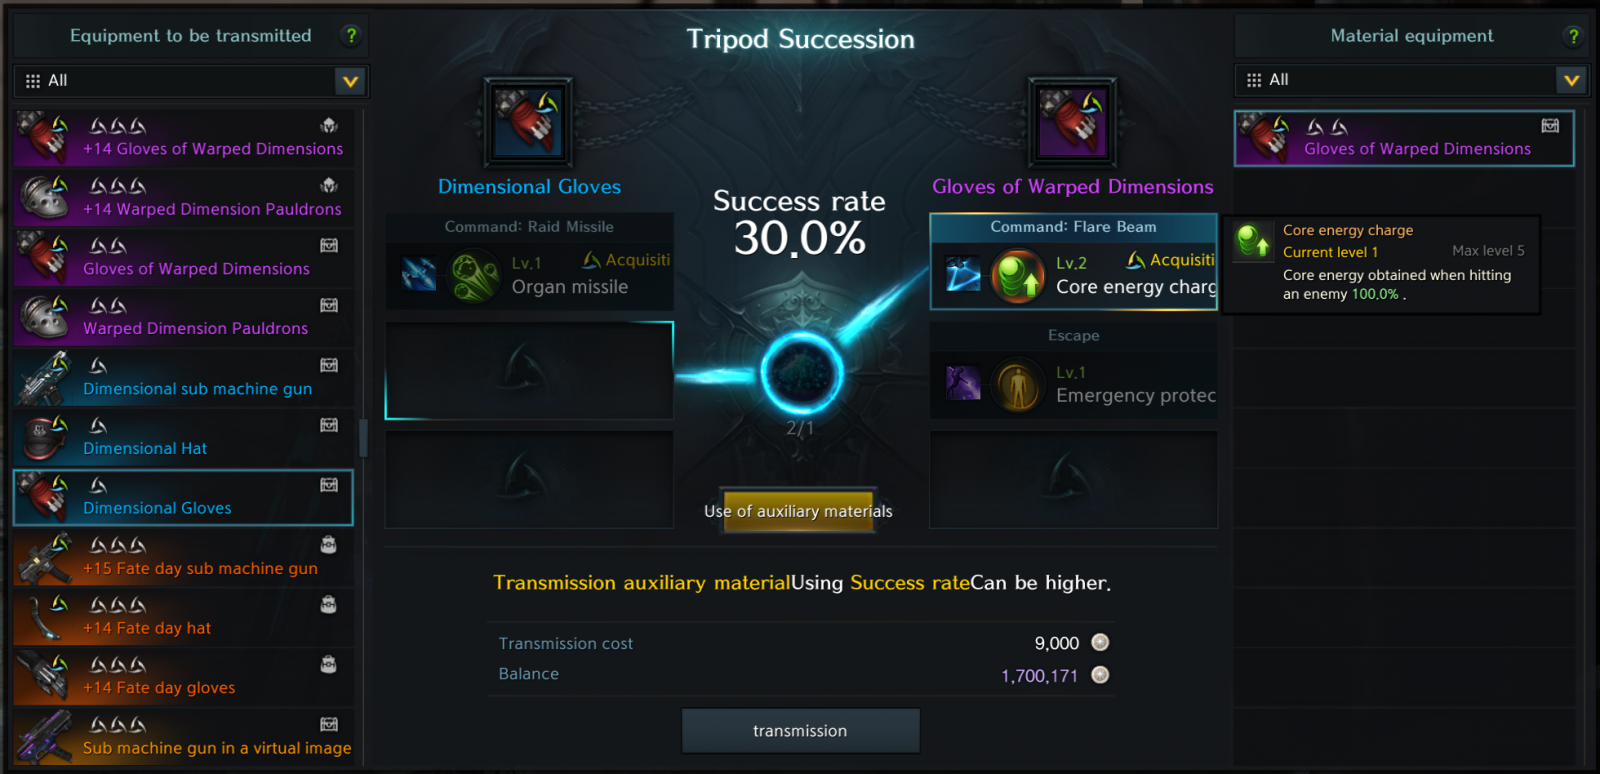
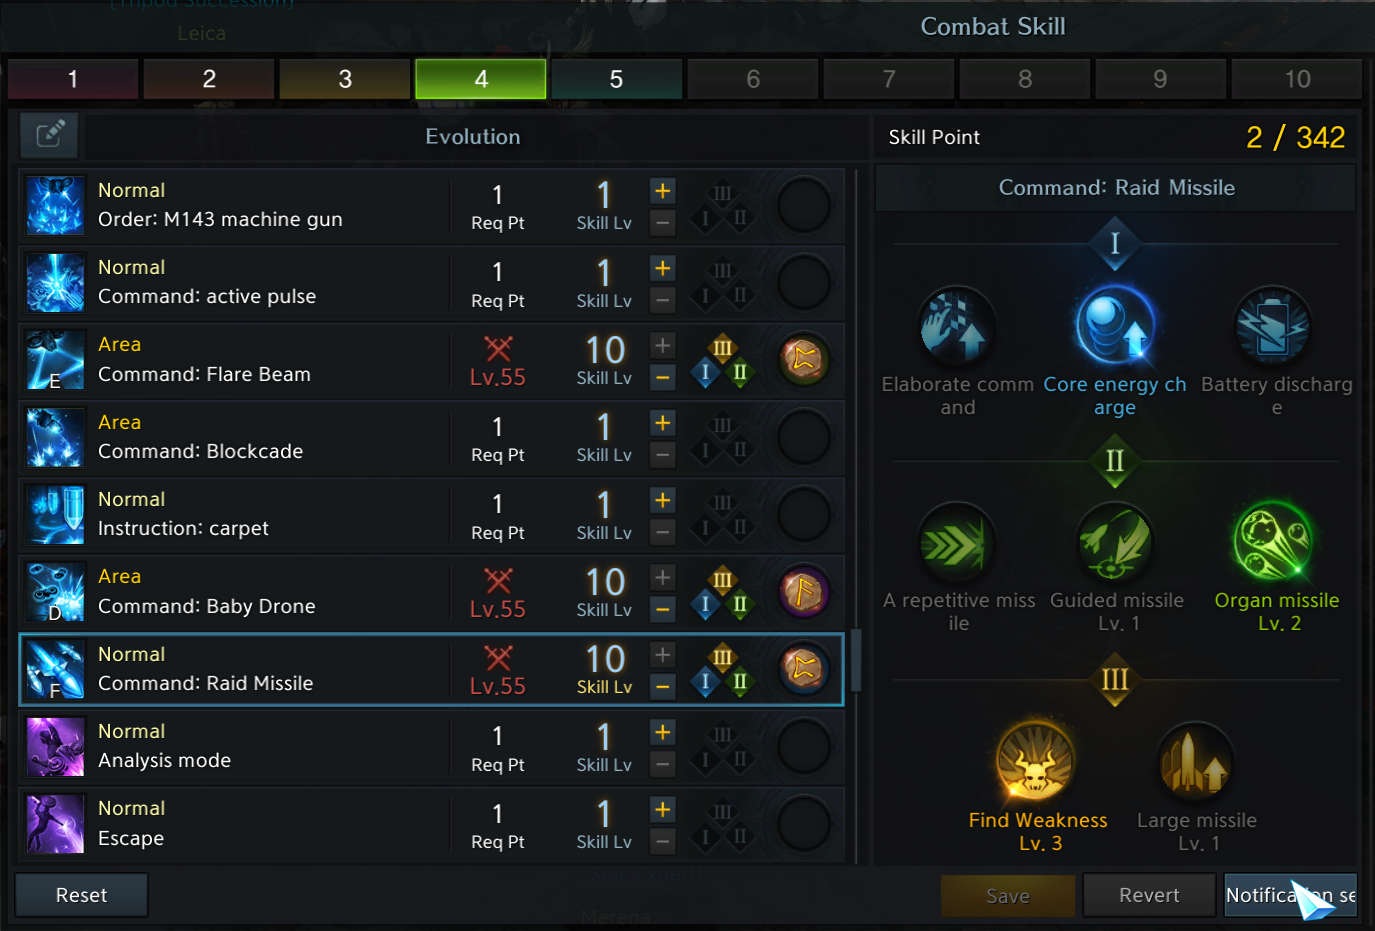
Starting with T3 gear, there will be additional tripod wires on weapons and armor. The system is independent of T1 and T2 gears. These will increase the tripod's power, reaching level 1+ capabilities. This may be the only solution to improve the degree of these tripods. Note that duplicate tripods on armor and weapons do not stack. Only the tallest will apply. You can freely transfer the tripod from any item slot. For example, if the helmet has a tripod you want, you can move it to your weapon.
The chance to succeed in tripod transfer depends on the level of the tripod trait you're trying to transfer.
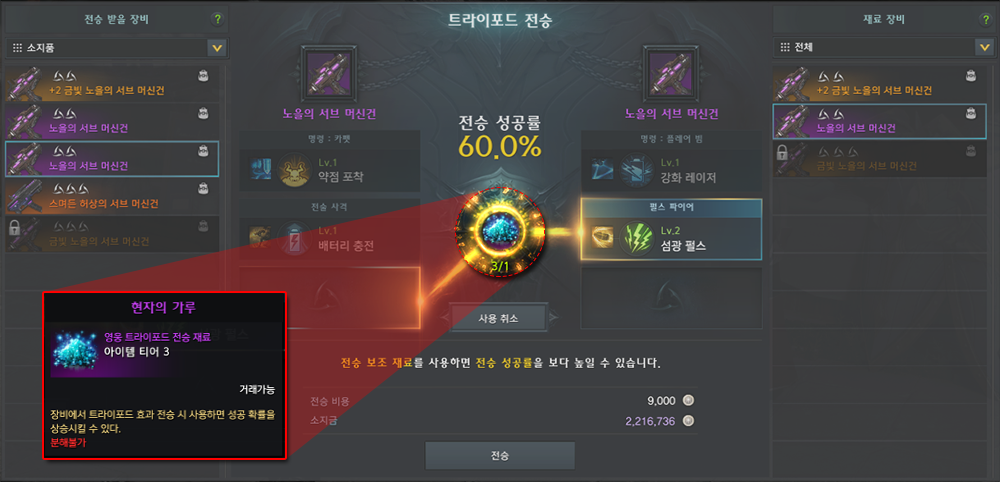
These odds can be doubled by using tripod powder crafted with Silmael Bloodstone, bought, or earned from weekly challenge Guardian raids (one per raid). You can only double your chances of success with one powder type and cannot increase your chances further. Due to the amount of gear dropped by Chaos Dungeon, you'll try a higher-level tripod multiple times a day. Items you try to remove the tripod from (right side of UI) will be destroyed whether you fail or succeed.
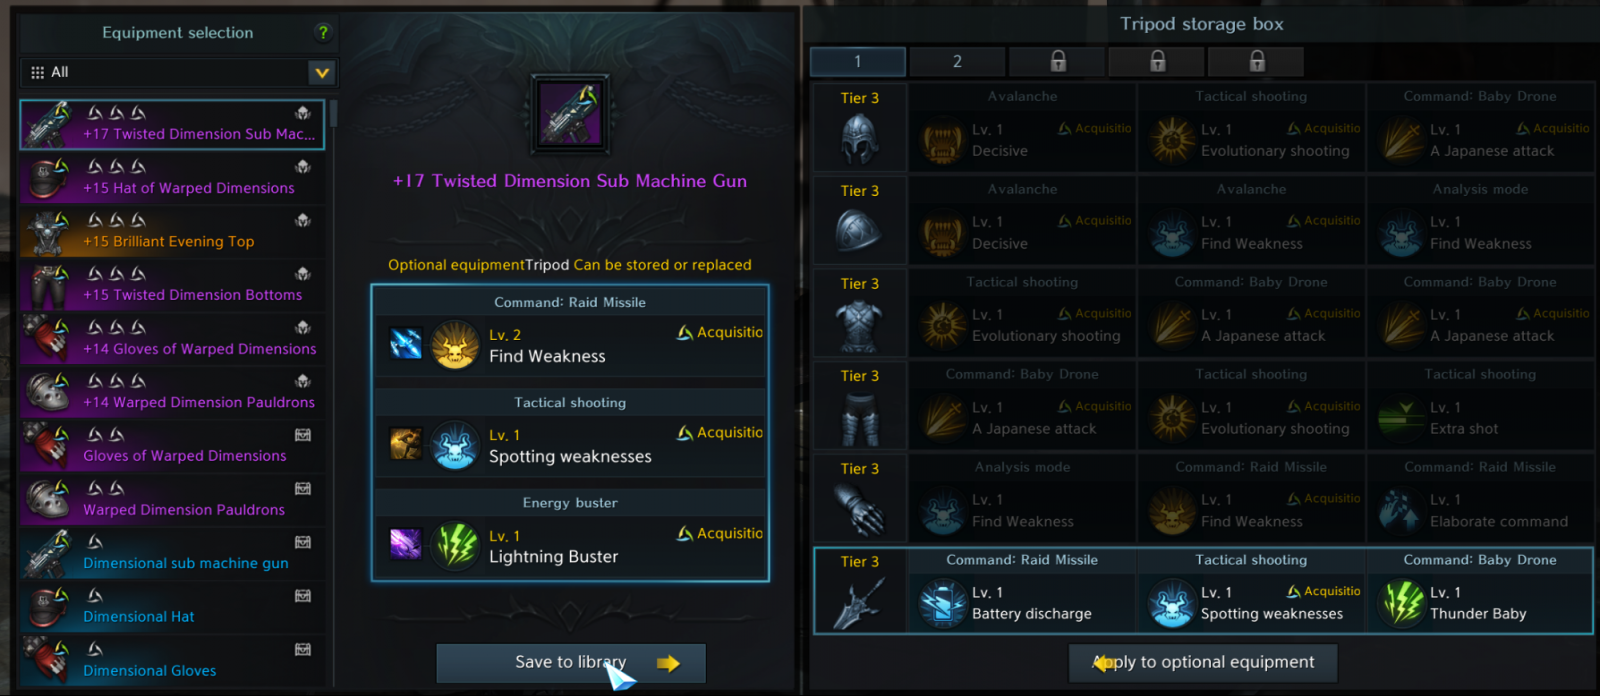
In addition to this system, since you can exchange your main items for new ones (such as in the event of a successful conversion to higher quality items or set items), it is possible to keep a tripod for all items changed to new items.
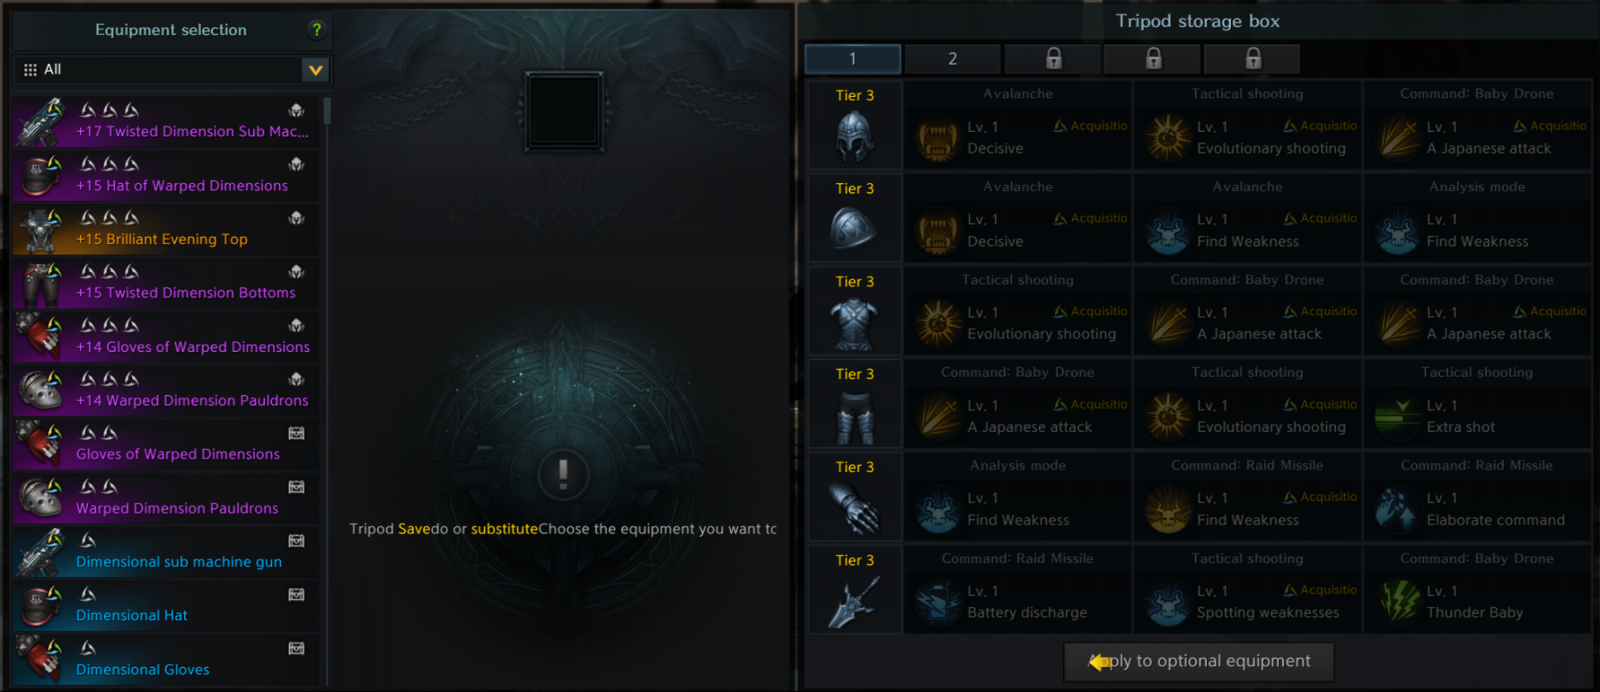
In a similar NPC, the locker menu can recollect a set of tripods through your chosen objects. Every tab in the tripod storage box can retailer a tripod from every single slot over the left side gadget.
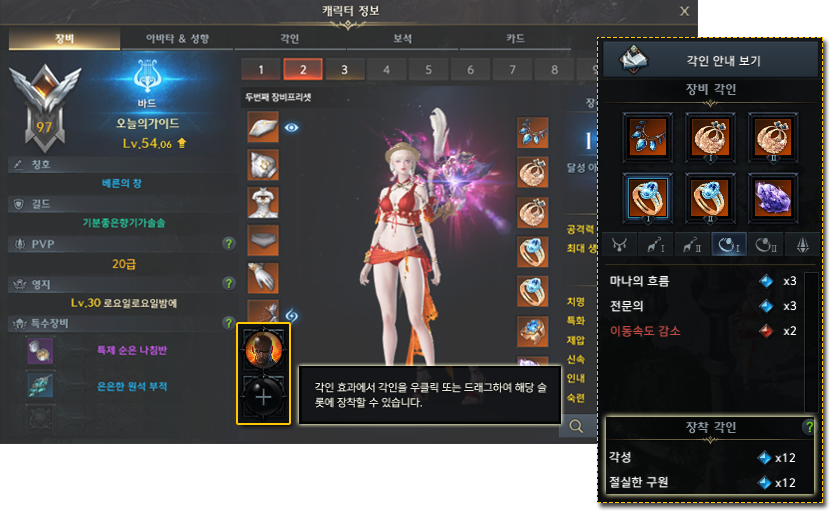
In addition to simple effects and combat stats, your add-ons can supply engraving levels that give your character more passive results.
First, there are two types of engraving: ordinary carving and Begonia carving. Begonia carving will inflict a massive penalty on your character. Begonia carving includes attack power reduction, attack speed reduction, movement speed reduction, and defense reduction. All values except Defense are reduced by 2%/4%/6% per level. Defense reduced by 5/10/15%. This is not the same as taking 5/10/15% more damage.
Your accessory will provide engravings added to the gauge found in the Stamps tab of your character info.
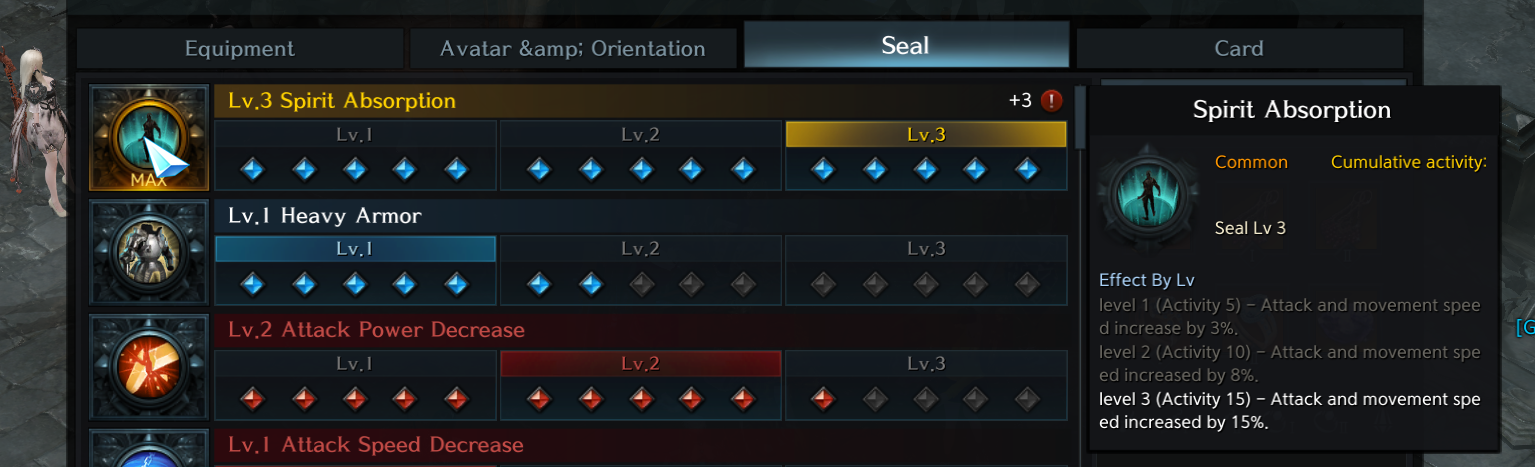
To activate the normal or malus carving bonus, you must accumulate enough points to activate the Lv. 1. Lu. 2, or Lv. Three effects. They are activated at 5, 10, and 15, respectively. See the heavy armor engraving in the photo above. Those 6th and 7th diamonds have no effect. It's just an Lv. 1 heavy armor until I get ten diamonds.
The number of normal and malus engraving points found on each accessory is highly dependent on slot and rarity.
|
Rarity |
Necklace |
Earring |
Ring |
Ability Stone |
|
T1-3 Rare |
+1 Normal |
+1 Normal |
+1 Normal |
+0-6 Normal +0-6 Normal +0-6 Malus |
|
T1-3 Heroic |
+1-2 Normal +1-2 Normal +1-3 Malus |
+1-2 Normal +1-2 Normal +1-3 Malus |
+1-2 Normal +1-2 Normal +1-3 Malus |
+0-8 Normal +0-8 Normal +0-8 Malus |
|
T1-3 Legendary |
+2-3 Normal +2-3 Normal +1-3 Malus |
+2-3 Normal +2-3 Normal +1-3 Malus |
+2-3 Normal +2-3 Normal +1-3 Malus |
+0-9 Normal +0-9 Normal +0-9 Malus |
|
T1/T2 Relic |
+3 Normal +3 Normal +1-3 Malus |
+3 Normal +3 Normal +1-3 Malus |
+3 Normal +3 Normal +1-3 Malus |
+0-10 Normal +0-10 Normal +0-10 Malus |
|
T3 Relic |
+3-5 Normal +3 Normal +1-3 Malus |
+3-5 Normal +3 Normal +1-3 Malus |
+3-5 Normal +3 Normal +1-3 Malus |
+0-10 Normal +0-10 Normal +0-10 Malus |
|
T3 Ancient |
+4-6 Normal +3 Normal +1-3 Malus |
+4-6 Normal +3 Normal +1-3 Malus |
+4-6 Normal +3 Normal +1-3 Malus |
N/A |
For T1 accessories, the malus only goes to +1. For T2 accessories, the malus can go to 1-2.
You can engrave your class on necklaces, earrings, and ring grooves on your accessories. You cannot roll your class engraving on skill stones. Also, note that when accessories are dropped in content like Chaos Dungeon or Guardian Assault, you cannot get class engravings for other classes, only your class engravings.
Balance your accessories carefully to get as much normal engraving as possible while avoiding crabapple engraving. Even if the imprinted penalty seems trivial, the equivalent volume of doing the job demanded to counteract it can be very high, particularly if your assault power drops.
Note the game UI will warn you if you find, in fact, also many elements on the provided sculpt. There is no penalty for being over 15, just to let you know that you might be able to prune a bit in some places and maybe optimize for another sculpt.
In addition to the natural engraving on accessories, you can also equip imprints. By equipping sigils, you can earn 3, 6, 9, or 12 points for specific engravings, up to 24 points for equipping two legendary sigils in T3.
You can earn each level of imprint by using Seal Books that come from various contents. You must use 20 Seal Books to unlock the imprint associated with it.
Some notable sources include:
# of Points - Books Needed
All engravings require 20 books for each imprint stage.
Often, the content rewards seal books in the form of curated or random sachets or usually give you a random book. They will possess a preference or maybe a random pouch for all normal engravings, or perhaps a preference or possibly a random pouch for all Class engravings. For that reason, a specific engraving no longer originates from a particular material.
Once you learn an imprint, you can use it as many times as you want, and the learned imprints are shared on all characters you have on a server.
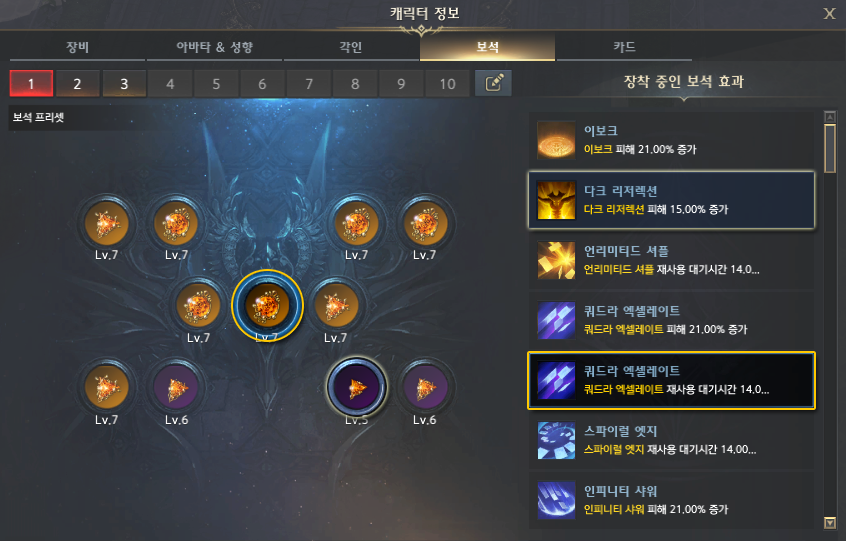
Jewels can be obtained and equipped, starting with T2 gear and contents. This system was not relevant to NA/EU initially.
You can equip jewels from the fourth tab of your character information window.
Jewelry comes primarily from Chaos Dungeon, but there are some other sources. Jewelry is divided into types and grades. You must equip a jewel whose level matches or exceeds the item level of your accessory to receive its full rewards. Equipping higher-tier jewelry with lower-tier accessories will not give you additional bonuses. However, you will incur a high penalty when using lower-tier jewels in higher-level content.
Jewels can be upgraded up to level 10. They require three jewel combinations from the previous level and are always 100% successful in upgrading to the next level. You will always combine jewelry into your class jewelry. You can combine jewelry from other classes into your class jewelry or reroll jewelry from other classes. Because of this, it's possible to send jewels from everyday content on the trumpet to your protagonist so they can improve their jewels faster because jewels are always unbound. When combined, it's random if you get a damage gem or a cooldown gem, no matter which gem combination you use. You cannot change gems to other types. You can change the gem skill gained with Lost Ark Silver at the appropriate NPC or through the pet's ranged ability. The cost increases with level and gem level.
You can equip and unequip jewels for free. You can not have two jewels of the same sort affect a skill. Only higher-tier gems will apply. You may have a cooldown gem and a damage gem that affect the same skills. There are always up to 11 gem slots available.
|
Level |
Jewel of Desire (Jewel Tier 2) |
Jewel of Clarity (Jewel Tier 2) |
Prominence Gem (Jewel Tier 3) |
Annihilation Gem (Jewel Tier 3) |
|
Level 1 |
2% Cooldown Reduction |
3% Increased Damage |
2% Cooldown Reduction |
3% Increased Damage |
|
Level 2 |
4% Cooldown Reduction |
6% Increased Damage |
4% Cooldown Reduction |
6% Increased Damage |
|
Level 3 |
6% Cooldown Reduction |
9% Increased Damage |
6% Cooldown Reduction |
9% Increased Damage |
|
Level 4 |
8% Cooldown Reduction |
12% Increased Damage |
8% Cooldown Reduction |
12% Increased Damage |
|
Level 5 |
10% Cooldown Reduction |
15% Increased Damage |
10% Cooldown Reduction |
15% Increased Damage |
|
Level 6 |
12% Cooldown Reduction |
18% Increased Damage |
12% Cooldown Reduction |
18% Increased Damage |
|
Level 7 |
14% Cooldown Reduction |
21% Increased Damage |
14% Cooldown Reduction |
21% Increased Damage |
|
Level 8 |
16% Cooldown Reduction |
24% Increased Damage |
16% Cooldown Reduction |
24% Increased Damage |
|
Level 9 |
18% Cooldown Reduction |
30% Increased Damage |
18% Cooldown Reduction |
30% Increased Damage |
|
Level 10 |
20% Cooldown Reduction |
40% Increased Damage |
20% Cooldown Reduction |
40% Increased Damage |
As you can see, tier 3 jewels do not offer higher rewards despite being higher tiers. Instead, they can be inserted into Tier 3 accessories without penalty. The system strongly encourages you to get a new set of jewels at each new level, so you can't be complacent with your existing jewels. However, be aware that you can still use lower-level jewels for a few levels even with the penalty until you get the next level of mid-level jewels. For example, you can use a tier 8 T2 gem until you get a tier 4 or 5 replacement T3 gem.
If you're at the beginning of a new tier, you'll most likely be using jewels of that tier for at least a year before adding your next set, so even if they get stronger, they're not a bad investment. Re-temporary.
Starting from all content in South Vern, T2 jewels are 50% less effective in Legion Raids, T6 Guardian Raids and up, and 1415 Chaos Dungeons and up, regardless of whether they're slotted in lower-tier accessories or not. Additionally, T1 and T2 accessories have a 70% basic and additional effect penalty in these contents. This penalty can be seen clearly on your stat window designated by red arrows going down next to your accessory.
Due to how expensive it can be to reroll jewels at the NPC, I strongly recommend that you buy the exact jewel with the exact bonus you want for a given skill directly from other players. Rerolling even a level 7 T3 jewel can eat up millions of Silver to get the desired outcome. You can always sell off your excess jewels.
Related: The complete guide to skill points, skill attributes, and skill runes in Lost Ark!
Inside the situation of Chaos Dungeon and Guardian Raids, If it looks like an approaching stage or boss rewards precisely the same objects, they may supply additional components.
|
Item Type |
Set Bonus |
Acquisition Location |
iLvl Advised |
|
Rare T1 Equipment |
(No Set Bonus) |
Chaos Dungeon (Vern) |
250-580 |
|
“Noble Demeanor” Heroic T1 Set |
2-Set: +8% Attack Speed
5-Set: +10% Additional Damage |
Abyss Dungeon (Valley of Beasts)
Abyss Dungeon (Spirit of the Necromancer) |
340 |
|
“Furious Nature” Legendary T1 Set |
2-Set: +8% Movement Speed
5-Set: When hitting boss level or higher monsters, Attack Power increases by 4% for 8 seconds, up to 12% (3 second internal cooldown). |
Abyss Dungeon (Corridor of the Twisted Lord)
Abyss Dungeon (Hildebrigne, Dream Palace) |
460
|
|
“Ferocious Spirit” Legendary T1 Set |
2-Set: When hitting boss level or higher monsters, attack speed increases by 4% for 6 seconds, up to 8% (3 second internal cooldown).
5-Set: Increases damage dealt to boss level or higher monsters by 12%. |
|
Content Type |
Rewards |
Ticket Location |
iLvl Advised |
|
Cube |
Silver T2 Training Auxiliary Materials Card EXP Uncommon Seal Book Masterpiece #14, #24 |
Chaos Dungeon (Vern) Chaos Dungeon (Rohendel) Silmael Bloodstone NPC |
302 |
|
Tower of Shadow (First Clear) |
6 Skill Points 1 Giant’s Heart Masterpiece #17 Rapport Items Card EXP Card Packs Uncommon Seal Book Uncommon Class Seal Book Rare Follow-Up Rune |
No ticket needed. |
302 to start. 540 to finish. |
|
Tower of Shadow (Subsequent Character Clears) |
Fragments of Harmony Leap Stone of Harmony Guardian Stone Fragments Destruction Stone Fragments Silver |
No ticket needed. |
302 to start. 540 to finish. |
|
Guardian Raid |
Raid Tier |
Main Rewards |
iLvl Advised |
|
Ur’nil
|
1 |
Rare T1 Accessories Rare T1 Ability Stone Destruction Stone Fragment (Unbound) Guardian Stone Fragment (Unbound) Leap Stone of Harmony (Unbound) Uncommon Seal Book Rare Seal Book Uncommon Gale Rune |
302 |
|
Lumerus
|
1 |
Heroic T1 Accessories Rare T1 Ability Stone Destruction Stone Fragment (Unbound) Guardian Stone Fragment (Unbound) Leap Stone of Harmony (Unbound) Uncommon Seal Book Rare Seal Book Uncommon Gale Rune |
340 |
|
Icy Legoros
|
1 |
Heroic T1 Accessories Heroic T1 Ability Stone Destruction Stone Fragment (Unbound) Guardian Stone Fragment (Unbound) Leap Stone of Harmony (Unbound) Uncommon Seal Book Rare Seal Book Uncommon Gale Rune |
380 |
|
Vertus
|
1 |
Legendary T1 Accessories Legendary T1 Ability Stone Destruction Stone Fragment (Unbound) Guardian Stone Fragment (Unbound) Leap Stone of Harmony (Unbound) Uncommon Seal Book Rare Seal Book Uncommon Gale Rune |
420 |
|
Chromanium
|
2 |
Legendary T1 Accessories Legendary T1 Ability Stone Destruction Stone Fragment (Unbound) Guardian Stone Fragment (Unbound) Leap Stone of Harmony (Unbound) Uncommon Seal Book Rare Seal Book Rare Gale Rune |
460 |
|
Nacrasena
|
2 |
Legendary T1 Accessories Legendary T1 Ability Stone Destruction Stone Fragment (Unbound) Guardian Stone Fragment (Unbound) Leap Stone of Harmony (Unbound) Uncommon Seal Book Rare Seal Book Rare Gale Rune |
500 |
|
Flame Fox Yoho
|
2 |
Legendary T1 Accessories Legendary T1 Ability Stone Destruction Stone Fragment (Unbound) Guardian Stone Fragment (Unbound) Unbound Upper T1 Leap Stone Uncommon Seal Book Rare Seal Book Rare Gale Rune |
540 |
|
Tytalos
|
2 |
Legendary T1 Accessories Legendary T1 Ability Stone Destruction Stone Fragment (Unbound) Guardian Stone Fragment (Unbound) Leap Stone of Harmony (Unbound) Uncommon Seal Book Rare Seal Book Rare Gale Rune |
580 |
|
Item Type |
Set Bonus |
Acquisition Location |
iLvl Advised |
|
Rare T1 Equipment
|
(No Set Bonus) |
Chaos Dungeon (Yorn) |
550-1080 |
|
“Wonderland” Heroic T2 Set |
2-Set: +4% Attack & Movement Speed
5-Set: When landing an attack, there’s a chance to activate Velcroze’s Magic Lightning effect on the enemy (12 second internal cooldown) |
Abyss Dungeon (Path of Sighs)
Abyss Dungeon (The Fallen Furnace of Pride) |
870 |
|
“Firm Will” Legendary T2 Set |
2-Set: When using a mobile device (spacebar while not downed), Attack and Movement Speed increases by 8% for 4 seconds.
5-Set: Crit Chance +15%. |
Abyss Dungeon (Sea of Neglect)
Abyss Dungeon (Serene Karkosa)
Abyss Dungeon (Sanctuary of Arcadia) |
960 |
|
“Silent Guardian” Legendary T2 Set |
2-Set: Combat resource recovery speed is increased by 30%.
5-Set: Crit Damage +25%. |
|
Content Type |
Rewards |
Ticket Location |
iLvl Advised |
|
Elite Cube |
Silver T2 Training Auxiliary Materials Card EXP Heroic Seal Books Masterpiece #14, #24, #36, #40 |
Chaos Dungeon (Yorn) Chaos Dungeon (Faiten) Silmael Bloodstone NPC |
802 |
|
Corridor of Silence |
T2 Leap Stones T2 Jewels Card EXP Masterpiece #15, #25, #35, #41 |
802 to enter. |
|
|
Tower of Fate (First Clear) |
6 Skill Points 1 Giant’s Heart Legendary Affinity Items Card EXP Card Packs Rare Seal Book Rare Class Seal Book Heroic Follow-Up Rune |
No ticket needed. |
802 to start. 1040 to finish. |
|
Tower of Fate (Subsequent Character Clears) |
Fragments of Life Leap Stone of Life Guardian Stone Destruction Stone Silver |
No ticket needed. |
802 to start. 1040 to finish. |
|
Guardian Raid |
Raid Tier |
Main Rewards |
iLvl Advised |
|
Dark Legoros
|
3 |
Rare T2 Accessories Rare T2 Ability Stone Destruction Stone (Unbound) Guardian Stone (Unbound) Leap Stone of Life (Unbound) Rare Seal Book Heroic Seal Book Rare Gale Rune |
802 |
|
Helgaia
|
3 |
Heroic T2 Accessories Rare T2 Ability Stone Destruction Stone (Unbound) Guardian Stone (Unbound) Leap Stone of Life (Unbound) Rare Seal Book Heroic Seal Book Rare Gale Rune |
840 |
|
Calventus
|
3 |
Heroic T2 Accessories Heroic T2 Ability Stone Destruction Stone (Unbound) Guardian Stone (Unbound) Leap Stone of Life (Unbound) Rare Seal Book Heroic Seal Book Rare Gale Rune |
880 |
|
Achates
|
3 |
Legendary T2 Accessories Legendary T2 Ability Stone Destruction Stone (Unbound) Guardian Stone (Unbound) Leap Stone of Life (Unbound) Rare Seal Book Heroic Seal Book Rare Gale Rune |
920 |
|
Frost Helgaia
|
4 |
Legendary T2 Accessories Legendary T2 Ability Stone Destruction Stone (Unbound) Guardian Stone (Unbound) Leap Stone of Life (Unbound) Rare Seal Book Heroic Seal Book Heroic Gale Rune |
960 |
|
Lava Chromanium
|
4 |
Legendary T2 Accessories Legendary T2 Ability Stone Destruction Stone (Unbound) Guardian Stone (Unbound) Leap Stone of Life (Unbound) Rare Seal Book Heroic Seal Book Heroic Gale Rune |
1000 |
|
Levanos
|
4 |
Legendary T2 Accessories Legendary T2 Ability Stone Destruction Stone (Unbound) Guardian Stone (Unbound) Leap Stone of Life (Unbound) Rare Seal Book Heroic Seal Book Heroic Gale Rune |
1040 |
|
Alberhastic
|
4 |
Legendary T2 Accessories Legendary T2 Ability Stone Destruction Stone (Unbound) Guardian Stone (Unbound) Leap Stone of Life (Unbound) Rare Seal Book Heroic Seal Book Heroic Gale Rune |
1080 |
|
Item Type |
Acquisition Location |
iLvl Advised |
|
Rare Basic T3 Lower Gear |
Chaos Dungeon (Punika - Star 1-2) Chaos Dungeon (Punika - Month 1-2) |
1050-1310 1325-1340 |
|
Heroic Set T3 Lower Gear |
Abyss Dungeon (Eye of Aira - Normal) Abyss Dungeon (Oreha Prabasa - Normal) Abyss Dungeon (Eye of Aira - Hard) Abyss Dungeon (Oreha Prabasa - Hard) |
1325 1340 1355 1355 |
|
Heroic Basic T3 Lower Gear |
Chaos Dungeon (Punika Month 3) |
1355 |
|
Legendary Set T3 Lower Gear |
Abyss Dungeon (Eye of Aira - Hard) Abyss Dungeon (Oreha Prabasa - Hard) |
1355 1355 |
|
Legendary Set T3 Mid Gear |
Abyss Raid (Argos) |
1370 |
|
Upgrade Materials |
Kakul-Saydon Legion Raid (Rehearsal) |
1385 |
|
Legendary Broken T3 Gear |
Chaos Dungeon (Punika Sun 1-3) Chaos Dungeon (South Vern 1) |
1370-1415 |
|
Legendary Set T3 Legion Gear |
Valtan Legion Raid (Normal) |
1415 |
|
Relic Set T3 Legion Gear |
Valtan Legion Raid (Hard) |
1445 |
|
Relic Broken T3 Gear |
Chaos Dungeon (South Vern 2-3) |
1445-1475 |
|
Legendary Set T3 Legion Gear |
Vykas Legion Raid (Normal) |
1430 |
|
Mid Relic Set T3 Legion Gear |
Vykas Legion Raid (Hard) |
1460 |
|
Relic Set Upgrade Materials |
Kakul-Saydon Legion Raid (Normal) |
1475 |
|
Upper Relic Set T3 Legion Gear |
Brelshaza Legion Raid (Normal) |
1490-1520 |
|
Upper Ancient Set T3 Legion Gear |
Brelshaza Legion Raid (Hard) |
1540-1560 |
|
Content Type |
Rewards |
Ticket Location |
iLvl Advised |
|
Dimension Cube (Normal) |
T3 Leap Stones T3 Jewels Masterpiece #15, #25, #35, #41. #46 |
Chaos Dungeon (Punika) Silmael Bloodstone NPC |
1302 |
|
Corridor of the Sun (Normal) |
Lower T3 Leap Stones Mid T3 Leap Stones Card EXP |
1302 to enter. |
|
|
Dimension Cube (Hard) |
? |
Chaos Dungeon (South Vern Void) |
1490 |
|
Corridor of the Sun (Hard) |
? |
Chaos Dungeon (South Vern Void) |
1490 to enter. |
|
Way of Power |
Silver Upgrade Materials (all) Upgrade Books Legendary Seal Books Jewels
Rewards are once per expedition (one on each stage). You can skip to any stage you want, and completing that stage gives you the rewards for all previous floors as well. |
No ticket needed. |
1325 to enter. ~1415 to clear comfortably. |
|
Kouku-Saton Rehearsal |
Silver Legendary T3 Accessories Legendary T3 Ability Stone Upgrade Materials (all) Legendary Upgrade Books Legendary Seal Book Legendary Card Pack Card EXP Relic Affinity Items Sticker Pack |
No ticket needed. One entry per expedition per week. |
1385 |
|
Brelshaza Deja Vu |
Silver Relic T3 Accessories Relic T3 Ability Stone Upgrade Materials (all) Relic Upgrade Books Legendary Seal Book Legendary Card Pack Card EXP Relic Affinity Items Sticker Pack |
No ticket needed. One entry per expedition per week. |
1430 |
|
Calendar Boss Moake |
T3 Training Auxiliary Materials T3 Destruction Stone T3 Guardian Stone Jewels Card Experience Legendary Bleed Rune Star of Orpheus |
No ticket needed. |
1415 |
|
Calendar Boss Thunderwing |
T3 Training Auxiliary Materials T3 Destruction Stone T3 Guardian Stone Jewels Card Experience Legendary Bleed Rune Chaos Stone |
1460 |
*Calendar bosses were included due to unique loot tables compared to previous ones.
|
Guardian Raid |
Raid Tier |
Main Rewards |
iLvl Advised |
|
Heavy Armor Nacrasena
|
5 |
Rare T3 Accessories Rare T3 Ability Stone Destruction Stone Crystal (Unbound) Guardian Stone Crystal (Unbound) Leap Stone of Honor (Unbound) Heroic Seal Book Legendary Seal Book Heroic Gale Rune |
1302 |
|
Ingrexion
|
5 |
Heroic T3 Accessories Rare T3 Ability Stone Destruction Stone Crystal (Unbound) Guardian Stone Crystal (Unbound) Leap Stone of Honor (Unbound) Heroic Seal Book Legendary Seal Book Heroic Gale Rune |
1325 |
|
Night Fox Yoho
|
5 |
Heroic T3 Accessories Heroic T3 Ability Stone Destruction Stone Crystal (Unbound) Guardian Stone Crystal (Unbound) Great Leap Stone of Honor (Unbound) Heroic Seal Book Legendary Seal Book Heroic Gale Rune |
1355 |
|
Belganus
|
5 |
Legendary T3 Accessories Legendary T3 Ability Stone Destruction Stone Crystal (Unbound) Guardian Stone Crystal (Unbound) Great Leap Stone of Honor (Unbound) Heroic Seal Book Legendary Seal Book Heroic Gale Rune |
1385 |
|
Deskaluda
|
6 |
Legendary T3 Accessories Relic T3 Accessories Relic T3 Ability Stone Destruction Stone Crystal (Unbound) Guardian Stone Crystal (Unbound) Unbound Mid T3 Leap Stone Heroic Seal Book Legendary Seal Book Legendary Gale Rune |
1415 |
|
Kungelanium
|
6 |
Relic T3 Accessories Relic T3 Ability Stone Destruction Stone Crystal (Unbound) Guardian Stone Crystal (Unbound) Great Leap Stone of Honor (Unbound) Heroic Seal Book Legendary Seal Book Legendary Gale Rune |
1460 |
|
Caliligos
|
6 |
Relic T3 Accessories Relic T3 Ability Stone Great Destruction Stone Crystal (Unbound) Great Guardian Stone Crystal (Unbound) Wonderful Leap Stone of Honor (Unbound) Heroic Seal Book Legendary Seal Book Legendary Gale Rune |
1490 |
|
Hanumatan
|
6 |
Ancient T3 Accessories Ancient T3 Ability Stone Great Destruction Stone Crystal (Unbound) Great Guardian Stone Crystal (Unbound) Wonderful Leap Stone of Honor (Unbound) Heroic Seal Book Legendary Seal Book Legendary Gale Rune |
1540 |
|
Set Name |
2-Piece Heroic Set Effect |
5-Piece Heroic Set Effect |
|
Sunset |
When hitting a Usual or reduced grade monster with less than 30% HP, it drops Purified Ether every single 10 seconds. |
When hitting a staggered target, Domination increases by 50 for 15 seconds. Stacks up to 7 times. 1 second cooldown. |
|
Warm Evening |
Reduces Cooldown Time of mobile device (spacebar when not downed) by 10%. |
When you use a talent, get a Festival stack for twelve seconds. At six stacks, you achieve the Finale effect which increases damage dealt to enemies by 10% for 1 minute. After you get the Finale buff, you acquire the Insanity buff just after casting 17 far more competencies within the one minute buff. This will likely quickly remove Finale and apply a 15% injury buff for 20 seconds. Although the Madness or Insanity buff is in result, you cannot achieve stacks of Festival. There isn't a cooldown on gaining stacks. |
|
Brilliant Twilight |
When hitting an enemy, Attack Speed and Movement Speed increases by 3% for 8 seconds. Stacks up to 3 times. 3 seconds cooldown. |
When hitting a Boss or larger grade monster, Movement Pace increases by 20% for twenty seconds. When hit, this result is removed. Should the buff expires without the need of becoming hit, Attack Speed increases by 15% and Added Damage by 20% for 10 seconds. 30 seconds cooldown. |
Saint's Note: Warm Evening is the only reasonable choice for all DPS synergies and Gunlancer. Brilliant Twilight has awful uptime, and it's easy to screw up the buff. Bard and Paladin can run 2/2/2 from all three sets.
|
Set Name |
2-Piece Set Effect |
5-Piece Set Effect |
|
Choice |
When hitting an Abyss Raid monster, obtain Argos’ Electrical power, which increases damage dealt by 20% for 20 seconds (60 2nd cooldown). |
Increases harm dealt to enemies beneath Guardian level by 10%. |
|
Relentless Oath |
Each and every time you hit an enemy, acquire a stack of Moon Power for 6 seconds (3 2nd cooldown). Moon Energy increases Crit Damage by 6%, stacking as much as 5 occasions. Can not stack with Solar Power from the Destined Decision set. |
After you attain 5 stacks of Moon Electrical power, the result changes for the Full Moon buff. Through the Full Moon buff, when you method inside of 3m of a player that has the Hefty result from the Destined Choice set, gain the Complete Lunar Eclipse buff.
Full Moon: Increases Crit Damage by 40% for 15 seconds.
Total Lunar Eclipse: Increases Crit Chance by 25% and Crit Damage by 40% for 15 seconds. |
|
Destined Decision |
Every time you hit an enemy, gain a stack of Solar Power for 6 seconds (3 second cooldown). Moon Power increases Crit Opportunity by 3%, stacking up to five instances. Are not able to stack with Moon Energy from the Relentless Oath set. |
When you reach 5 stacks of Solar Power, the effect changes to the Heavy buff. During the Hollow buff, when you method inside 3m of a player that has the complete Moon effect from your Relentless Oath set, acquire the Complete Solar Eclipse buff.
Hollow: Increases Crit Chance by 25% for 15 seconds.
Total Solar Eclipse: Increases Crit Chance by 25% and Crit Damage by 40% for 15 seconds. |
Saint's Note: DPS synergy usually goes Destined Decision, but some who have high natural crit, especially with tripods, go Relentless Oath. Bard and Paladin ALWAYS go full Relentless Oath to activate the 5-piece bonus for DPS players.
|
Set Name |
2-Piece Set Effect |
4-Piece Set Effect |
6-Piece Set Effect |
|
Beast Power |
When hitting an enemy, gain a stack of Balancing Power. Lose a stack when hit by an attack.
Bombardment Power: Gain 1% additional damage for 12 seconds (10 max). |
Changes the effect of Bombardment Power to Explosive Power.
When using a mobile device, gain 10% Movement Speed and Attack Speed for 10 seconds.
Explosive Power: Gain 2% additional damage for 12 seconds (10 max). |
Changes the effect of Explosive Power to Reinforced Explosive Power.
Damage taken from enemies is reduced by 10%.
Reinforced Explosive Power: Gain 4% additional damage for 12 seconds (10 max). |
|
Desire Whisper |
Every non-Crit hit grants you a stack of Enchanted. 0.3 second cooldown.
Enchanted: Increases Crit Chance by 10% per stack (10 max). Effect is lost on Crit hits. |
Changes the effect of Enchanted to Seduced.
Seduced: Increases Crit Chance by 25% per stack (4 max). Effect is lost on Crit hits. |
Crit Damage +40% |
|
Set Name |
2-Piece Set Effect |
4-Piece Set Effect |
6-Piece Set Effect |
|
Dominant Fang Lv. 1 |
Awakening damage is reduced by 50% and cooldown reduced by 20%. Acquire Inner Awakening buff for 2 minutes.
Inner Awakening: 18% Cooldown Reduction and +10% skill damage, excluding Awakening and mobility devices. |
The Inner Awakening effect is changed to provide 18% Cooldown Reduction and +25% skill damage, excluding Awakening and mobility devices. |
Inner Awakening effect additionally provides 30% Cooldown Reduction to mobility device and +15% damage to enemies. |
|
Dominant Fang Lv. 2 |
Awakening damage is reduced by 30% and cooldown reduced by 20%. Acquire Inner Awakening buff for 2 minutes.
Inner Awakening: 18% Cooldown Reduction and +10% skill damage, excluding Awakening and mobility devices. |
The Inner Awakening effect is changed to provide 20% Cooldown Reduction and +28% skill damage, excluding Awakening and mobility devices. |
Inner Awakening effect additionally provides 30% Cooldown Reduction to mobility device and +18% damage to enemies. |
|
Betrayal Instinct Lv. 1 |
When attacking, creates one of three powerful Ethers within 3m (1 minute cooldown). |
Creates an additional Ether (2 total) when the effect procs. When acquiring the same Ether more than once, the damage is amplified accordingly. |
Creates an additional Ether (3 total) when the effect procs. When all 3 Ethers are activated simultaneously, activate the Transcendence buff.
Transcendence: Increases Attack Speed by 40%, and 40% Cooldown Reduction for 30 seconds. Removes all debuffs and fully restores Mana and Identity Gauge. |
|
Betrayal Instinct Lv. 2 |
When attacking, creates one of three powerful Ethers within 3m (57 seconds cooldown). |
Creates an additional Ether (2 total) when the effect procs. When acquiring the same Ether more than once, the damage is amplified accordingly. Ether generation cooldown is reduced to 54 seconds. |
Creates an additional Ether (3 total) when the effect procs. When all 3 Ethers are activated simultaneously, activate the Transcendence buff. Ether generation cooldown is reduced to 50 seconds.
Transcendence: Increases Attack Speed by 40%, and 40% Cooldown Reduction for 30 seconds. Removes all debuffs and fully restores Mana and Identity Gauge. |
|
Swamp of Longing Lv. 1 |
When attacking, acquire the Blessing of Battle effect for 16 seconds (no cooldown).
Blessing of Battle: Increases Movement Speed and Identity Gauge gain by 15%. |
While Blessing of Battle is in effect, grants the Vitality effect to allies within 8m for 16 seconds.
Agility: Increases Attack and Movement Speed by 8%. |
Improves the Swiftness buff, additionally increasing the damage of allies by 8%. |
|
Swamp of Longing Lv. 2 |
When attacking, acquire the Blessing of Battle effect for 16 seconds (no cooldown).
Blessing of Battle: Increases Movement Speed and Identity Gauge gain by 18%. |
While Blessing of Battle is in effect, grants the Vitality effect to allies within 8m for 16 seconds.
Agility: Increases Attack and Movement Speed by 10%. |
Improves the Swiftness buff, additionally increasing the damage of allies by 10%. |
|
Grasp of Destruction Lv. 1 |
Protection effects (HP recovery, shield, and damage mitigation) additionally apply a stack of Seed of Life for 8 seconds.
Seed of Life: Increases Endurance by 25 (max 20 stacks). |
At 20 stacks, consumes Seed of Life to grant the ally the Life Active effect for 10 seconds.
Life Active: Restores 995 HP each second. If the target is under 30% HP, this effect doubles to 1990. |
Whenever a target is healed by Life Active, it grants a stack of Revival for 3 seconds.
Revival: Increases Attack Power by 2% (max 10 stacks). |
|
Grasp of Destruction Lv. 2 |
Protection effects (HP recovery, shield, and damage mitigation) additionally apply a stack of Seed of Life for 8 seconds.
Seed of Life: Increases Endurance by 30 (max 20 stacks). |
At 20 stacks, consumes Seed of Life to grant the ally the Life Active effect for 10 seconds.
Life Active: Restores 1300 HP each second. If the target is under 30% HP, this effect doubles to 1990. |
Whenever a target is healed by Life Active, it grants a stack of Revival for 3 seconds.
Revival: Increases Attack Power by 3% (max 8 stacks). |
|
Fascination Instinct Lv. 1 |
When attacking, there is a chance to inflict lightning damage in addition to Fire Vulnerable (0.5 second cooldown). The damage is reduced by up to 80% when hitting multiple enemies.
Fire Vulnerability: When the target takes fire damage, it takes it again
Note: Does not include skill damage. |
When attacking, there is a chance to inflict fire damage in addition to Lightning Vulnerable (0.5 second cooldown). The damage is reduced by up to 80% when hitting multiple enemies.
Lightning Vulnerability: When the target takes lightning damage, it takes it again.
Note: Does not include skill damage. |
Whenever inflicting lightning or fire damage, gain a stack of Emitted Energy, no cooldown.
Emitted Energy: When reaching 30 stacks, consume and acquire the Amplification effect.
Amplification: Increases fire and lightning damage from the set by 100% for 20 seconds. |
|
Fascination Instinct Lv. 2 |
When attacking, there is a chance to inflict strong lightning damage in addition to Fire Vulnerability (0.5 second cooldown). The damage is reduced by up to 80% when hitting multiple enemies.
Fire Vulnerability: When the target takes fire damage, it takes it again.
Note: Does not include skill damage. |
When attacking, there is a chance to inflict strong fire damage in addition to Lightning Vulnerability (0.5 second cooldown). The damage is reduced by up to 80% when hitting multiple enemies.
Lightning Vulnerability: When the target takes lightning damage, it takes it again
Note: Does not include skill damage. |
Whenever inflicting lightning or fire damage, gain a stack of Emitted Energy, no cooldown.
Emitted Energy: When reaching 30 stacks, consume and acquire Amplification effect.
Amplification: Increases fire and lightning damage from the set by 120% for 20 seconds. |
|
Death Lv. 1 |
Increases Crit Damage by 15%.
When using a Back or Head Attack, this number is adjusted to 50%. |
Whenever hitting a Back Attack or Head Attack, gain 20% Crit Chance for 5 seconds. |
Increases Damage to Enemies by 5%.
When using a Back or Head Attack, this number is adjusted to 18%. |
|
Death Lv. 2 |
Increases Crit Damage by 17%.
When using a Back or Head Attack, this number is adjusted to 55%. |
Whenever hitting a Back Attack or Head Attack, gain 23% Crit Chance for 5 seconds. |
Increases Damage to Enemies by 6%.
When using a Back or Head Attack, this number is adjusted to 21%. |
|
Nightmare Flower Lv. 1 |
If a skill uses mana, the mana cost is reduced by 50% and the damage is increased by 12%. |
When using your Awakening skill, you gain the Mana Addiction effect if your current mana is over 30%.
Mana Addiction: +15% additional damage, skills reduce 7% of your max mana additionally per cast. Effect is lost if any skill is used while under 30% mana and is replaced with Endless Mana.
Endless Mana: You regen 3% of your max mana per second, gain 20% cooldown reduction, and 12% attack/movement speed. |
The effects of Mana Addiction and Endless Mana are improved.
Mana Addiction: Further increases additional damage by 15%.
Endless Mana: Further increases cooldown reduction by 15% and attack/movement speed by 3%. |
|
Nightmare Flower Lv. 2 |
If a skill uses mana, the mana cost is reduced by 50% and the damage is increased by 15%. |
When using your Awakening skill, you gain the Mana Addiction effect if your current mana is over 30%.
Mana Addiction: +18% additional damage, skills reduce 7% of your max mana additionally per cast. Effect is lost if any skill is used while under 30% mana and is replaced with Endless Mana.
Endless Mana: You regen 3% of your max mana per second, gain 22% cooldown reduction, and 12% attack/movement speed. |
The effects of Mana Addiction and Endless Mana are improved.
Mana Addiction: Further increases additional damage by 18%.
Endless Mana: Further increases cooldown reduction by an additional 18% and attack/movement speed by an additional 3%. |
|
Hallucination Scream Lv. 1 |
On hit, gain the Hallucination effect. Effect cannot be refreshed and if it expires, there is a 3 second internal cooldown before it can proc again.
Hallucination: Increases damage by 13%. |
Increases Crit Chance by 15%.
Whenever you crit, increases the duration of Hallucination by 1 second (0.5 second internal cooldown). |
When maintaining Hallucination for at least 9 seconds, gain the Substance effect for 40 seconds.
Substance: Increases damage by 12% and Crit Chance by 5%.
Whenever you crit, increases the duration of Substance by 1 second (0.5 second internal cooldown). |
|
Hallucination Scream Lv. 2 |
On hit, gain the Hallucination effect. Effect cannot be refreshed and if it expires, there is a 3 second internal cooldown before it can proc again.
Hallucination: Increases damage by 15%. |
Increases Crit Chance by 18%.
Whenever you crit, increases the duration of Hallucination by 1 second (0.5 second internal cooldown). |
When maintaining Hallucination for at least 9 seconds, gain the Substance effect for 40 seconds.
Substance: Increases damage by 14% and Crit Chance by 7%.
Whenever you crit, increases the duration of Substance by 1 second (0.5 second internal cooldown). |
Saint's Note: Defeating Kukol-Saydon Normal rewards you with Frenzy Bugles, which are needed to upgrade any of your Relic items. It takes 10 Frenzy Bugles to upgrade armor and 25 for a weapon. You activate Lv. 2 set effects if you have that number of items from the set upgraded. So, for example, you can have Death Lv. 2 2-piece bonus while the rest of the set is the Death Lv. 1 bonus. Dismantling an item that has been upgraded will return all Frenzy Bugles used to upgrade it.

LostArkGold Editor contrasts the functions of all the most popular video games to show you the fun with the most effective real estate options
Like any good self-respecting MMO, Lost Ark (via its Una task system) rewards regular players, logging into the game several times a week. Una's Tasks are daily and weekly quests, allowing you to collect rewards such as Leapstones, Una Symbols, Masterpieces, Skill Potions, and Giants' Hearts.

Pirate Coins are an integral part of the popular MMO game Lost Ark, so we have prepared a guide showing you how to farm and collect them quickly.

Leveling up your Foraging skill in Lost Ark can help you get various materials such as Mushrooms, Flowers, and Plants and increase your movement speed after gathering food. The collected materials can be used to make potions for yourself or make a decent profit from merchants